Top Ten Reasons to Buy VS Team Foundation Server

Top Ten Reasons to Buy VS Team Foundation Server.

• Streamline The Flow of Data Across Your Entire Team
Project artifacts are stored in a central repository that facilitates in-context collaboration reducing waste in hand-over time between tasks and streamlines the development process allowing team members to focus on delivering value over transitioning information between roles.

• Reduce Risk with Real-time Visibility
Powerful reporting and dashboards provide historical trending and real-time visibility into overall project health. Real-time metrics give you early warnings of potential problems that enable you to be proactive and to make data-driven decisions and course corrections.

• End-to-end Traceability
Define, query and report on custom relationships between requirements, work items and test cases. Full traceability lets you track progress and quality back to business goals and customer requirements.

• Lightweight Agile Planning Tools
The new Excel Agile Planning Workbook makes it easy for teams to adopt Agile software development methodologies like SCRUM. Use it to create and manage user stories and product backlog, estimate the team’s velocity, and break the project down into iterations. The Iteration Backlog enables you to plan iterations and track progress.

• Project and Portfolio Management
Integration with Microsoft Project and Office Project Server enables business stake holders and project managers to gain insight into the health of inflight projects, understand how they support the business needs and help identify ways to improve existing processes.

• Simplified Installation for Smaller Teams
Smaller teams and individual developers can choose the new Basic Install option to leverage the power of Team Foundation Server 2010 without the footprint of the full installation.

• Understand Parallel Development
Reduce the complexity in branching and merging with powerful new visualization tools. Understand the scope, organization and maintenance of your source code and easily identify, track and manage changes across branches.

• Prevent Broken Builds
The new gated check-in feature helps teams working in the same branch to prevent costly and time consuming build breaks by testing code in isolation before it goes into the full repository.

• Flexible Build Automation
Windows Workflow-based builds with powerful features like build queuing and build agent pooling enable teams to easily customize, manage and scale out their build environments.

• Enterprise Scalability
Network Load Balancing, 64-bit server support and new project

Frequently Asked Questions

Frequently Asked Questions


Q: What is Windows Server 2012 Essentials?

A: The latest version of Windows Small Business Server, Windows Server 2012 Essentials is a flexible, affordable, and easy-to-use server solution designed and priced for small businesses with up to 25 uses and 50 devices that helps them reduce costs and be more productive. Windows Server 2012 Essentials is an ideal first server, and it can also be used as the primary server in a multi-server environment for small businesses. Windows Server 2012 Essentials enables small businesses to protect, centralize, organize and access their applications and information from almost anywhere using virtually any device. Additionally, Essentials has the ability to grow as your business grows, providing an elastic solution that allows you to purchase and then perform an in-place conversion to

Windows Server 2012 Standard if your business needs change over time. Customers can use Windows Server 2012 Essentials as a platform to run critical line-of-business applications and

other on-premises workloads, as well as to provide an integrated management experience when running cloud based applications and services, such as e-mail, collaboration, online backup, and more. In addition, Windows Server 2012 Essentials enables businesses to better protect their data through automated backup and restore capabilities, which provides the ability to recover from accidentally deleted or overwritten files, and to quickly recover and continue operations in the event of a disaster. And as business needs grow and change, Windows Server 2012 Essentials is able to grow as well, including the ability to perform an in-place upgrade to Windows Server 2012 Standard.

Q: Why did Microsoft create Windows Server 2012 Essentials?

A: There are roughly 36 million small and medium-size businesses (SMBs) worldwide with more than one PC, and many see IT as a strategic imperative to grow their business. SMBs are typically short on IT resources, but need powerful technology solutions similar to those used by even the largest companies. Building on the design philosophy of the current, award-winning Windows Small Business Server product, Windows Server 2012 Essentials provides small businesses with a flexible, affordable server solution that will help save time and money while significantly increasing employee productivity. Windows Server 2012 Essentials is the simplest way for small businesses to unleash the power of Windows Server 2012 and cloud-enable their IT.

Q: Why did Microsoft change the name of Windows Small Business Server Essentials to Windows Server Essentials?

A: Microsoft, along with its customers and partners, has enjoyed great success with Windows Small Business Server, and we are committed to continuing that success into the future. By formalizing Essentials as a core edition of the Windows Server 2012 family, we more clearly communicate how it is positioned in the market relative to the other Windows Server editions, simplify our messaging to our customers and partners, and increase the level of visibility of the product and its unique value for the small business market.

Top 10 reasons to try Visio 2010

Top 10 reasons to try Visio 2010

Microsoft Visio 2010 advanced diagramming tools help you simplify complexity with dynamic, data-driven visuals and new ways to share on the Web in real time. Whether you’re creating an organizational chart, a network diagram, or a business process, the new tools and more intuitive interface in Visio 2010 make it easier to bring your diagrams to life.

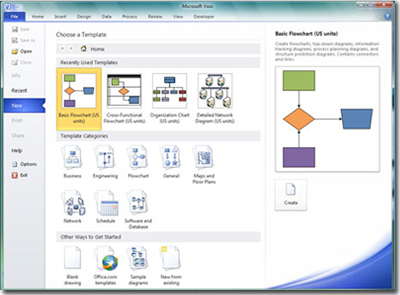
1) Jump-start diagramming with templates.

With modern, pre-drawn shapes, intelligent templates, and sample drawings, Visio 2010 offers a wide variety of options to meet your diagramming needs for IT, business, process management, and more.

2) Find and access the tools you need quickly.

Every step in creating a diagram is more intuitive, with the logical groupings of features in Ribbon tabs, an enhanced Shapes window for easy access to shapes and stencils, and a new status bar that helps you move more efficiently within and between your diagrams.

3) Draw diagrams faster with improved automatic features.

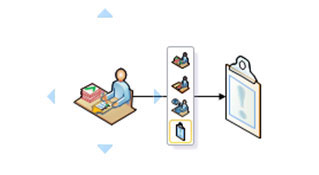
Whether you are creating a diagram from scratch or modifying an existing one, Visio 2010 helps you add and align shapes easily and accurately, with features such as the Quick Shapes Mini Toolbar, enhanced dynamic grid, page Auto Size, and automatic alignment and layout adjustment.

4) Simplify large and complex diagrams.

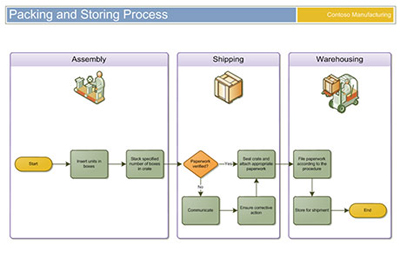
Add clarity to diagrams using Subprocesses and Containers to group related shapes visually and logically. As a diagram grows larger or becomes more complex, Subprocesses and Containers help you to keep information more organized and understandable.

5) Make your diagrams professional-looking and appealing in seconds.

Visio 2010 helps you make diagrams look attractive with a wide range of formatting tools and design options, including modern shapes and visuals, a rich gallery of themes, and Live Preview.

6) Bring your diagrams to life with real-time data.

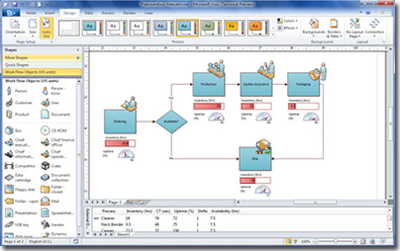
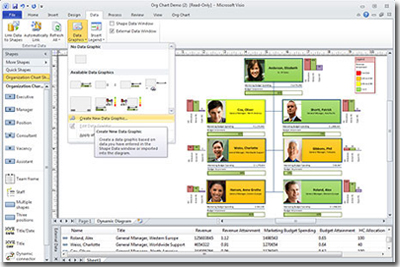
See the entire picture with dynamic, data-driven diagrams. Simply connect your diagram to one or more data sources such as Excel or SQL Server. Then, display real-time data right within your diagrams, based on conditions you define, using vibrant colors, icons, symbols, and data bars.

7) Share diagrams with others on the Web.

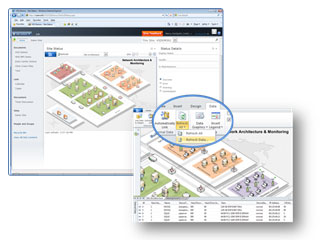
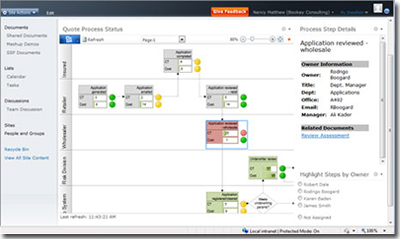
Easily share dynamic, data-linked Visio diagrams in Microsoft SharePoint Server. Online users can see your real-time information in their browsers at a high level, right on the diagram, or delve into the details—even if they don’t own Visio. They can pan and zoom in the diagram, follow hyperlinks in shapes, and refresh the data.


8) Ensure consistency and accuracy with diagram validation.

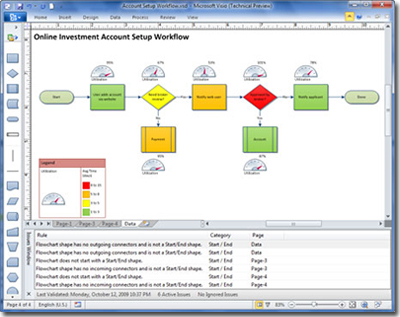
Check for common errors and support diagramming standards across your organization using diagram validation. With one click, you can validate a diagram against a set of rules to make sure it’s logical and properly constructed.

9) Model and monitor SharePoint workflows.

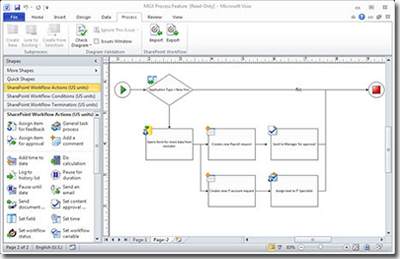
Create and monitor SharePoint workflows more easily than ever with a new, advanced template that contains SharePoint workflow rules and logic, and supports the ability to export and import workflows between Microsoft SharePoint Designer 2010 and Visio 2010.

10) Create visual mashups using Visio Services.

Publish and share visually compelling dashboards that contain interactive Visio diagrams and other application services. Visio Services and SharePoint Server integration supports visual mashups of actionable data and diagrams for an information-rich viewing experience.

Forefront TMG Editions

Forefront TMG Editions:

Forefront TMG is available in Standard Edition and Enterprise Edition.
Although the deployment needs of the network infrastructure are different, both editions include the same features and have the same protection and access control capabilities.
The following table compares and contrasts the features of the two editions in Forefront TMG.
 
 
Standard Edition
Enterprise Edition
Supported deployment scenarios
Standalone server
Server in a standalone array
Server in an array managed by EMS
CPU’s
Up to 4 CPU’s
Unlimited
Storage
local
Supports remote management of firewall policies and configuration settings.
Array/NLB/CARP support
x
You can only have one server in an array.
Yes
Enterprise Management
x
Yes, with the added ability to manage Standard Editions.
Publishing
Yes
Yes
VPN support
Yes
Yes
Forward proxy/cache compression
Yes
Yes
Network IPS (NIS)
Yes
Yes
E-mail Protection
Requires Exchange license
Web Protection
Requires subscription

Forefront 2010 Licensing Overview

Forefront Threat Management Gateway 2010
The Forefront TMG solution includes two separately licensed elements:
· Forefront TMG 2010* Server provides URL filtering, anti-malware inspection, intrusion prevention, application- and network layer firewall, and HTTP/HTTPS inspection in a single solution.
· Forefront TMG Web Protection Service provides continuous updates for malware filtering and access to cloud-based URL filtering to protect against the latest Web threats.

* Forefront TMG 2010 is licensed under the processor licensing model, with a license required for each physical or virtual processor accessed by an operating system environment running a TMG Server. This license does not require any device or user CALs
.
Forefront TMG 2010 Enterprise Edition and Standard Edition are offered in the following Microsoft licensing programs:
· Enterprise Agreement
· Enterprise Agreement Subscription
· Select
· Academic and Government Select
· ISV Royalty
· OEM
· Open
· Open Value
· Open Value Subscription
· Service Provider License Agreement (SPLA)
· Campus and School Agreement

* Forefront TMG Standard Edition is also available in Full Packaged Product (FPP) for retail sale through distributors.

Forefront TMG Web Protection Service is a subscription product licensed per user or per device. It is offered as a stand-alone product cor as part of the Enterprise CAL Suite or Forefront Protection Suite. TMG Web Protection Service is available in the same Microsoft licensing programs as Forefront TMG 2010, except for the following:
· ISV Royalty
· OEM
· Open
· FPP

Pricing

* All prices reflect pricing for purchases in the United States and Canada and appear in US dollars. The prices listed are estimated retail prices; reseller pricing may vary.

Required Software


* All prices reflect pricing for purchases in the United States and Canada and appear in US dollars. The prices listed are estimated retail prices; reseller pricing may vary.

Forefront Unified Access Gateway 2010
Forefront Unified Access Gateway 2010 is licensed through Microsoft Volume Licensing (MVLS) and requires:
· A server license, available either through an OEM appliance or as software. It gives the license holder the right to install and use the server software.
· A Client Access License (CAL) for each named or authenticated device or user that accesses a system running Unified Access Gateway. A Device CAL grants the right for one device (accessed by any user) to access the Unified Access Gateway server software. A User CAL permits one user (using any device) to access the server software.
· An optional external connector license is also available to enable external parties to access the network. Customers have the choice to license an external connector for each Unified Access Gateway Server that those external users will access, or to license a Unified Access Gateway CAL for each external user.
.
Customers can license Unified Access Gateway as part of the following Microsoft licensing programs:
· Enterprise Agreement
· Enterprise Agreement Subscription
· Select
· Select Plus
· Open
· Open Value
· Open Value Subscription
· Service Provider License Agreement (SPLA)
· Campus and School Agreements
· US Government

Purchasing Options
Customers can buy Unified Access Gateway server licenses:
· Through OEM partners if they want to buy Unified Access Gateway as a physical appliance. This includes the underlying Windows Server 2008 R2 license.
· From Microsoft Volume Licensing. These options require provisioning the license from a customer’s existing agreement. Appliances are available from Microsoft partner hardware vendors

Pricing


Unified Access Gateway Client Access Licenses
Product Licenses Price Description

Other Licenses


* UAG CALs will be added to the Enterprise CAL starting in spring 2010


Lync Server 2010 Licensing


Lync Server 2010 Licensing

Lync Server 2010 follows the Server/Client Access License (CAL) model. Under this model, a Lync Server 2010 license is required for each operating system environment running Lync Server 2010. A CAL is required for each user or device accessing the Lync Server. You can acquire Lync Server 2010 CAL as standalone servers and Client Access licenses (CAL) or you can purchase the CALs as part of the Microsoft Enterprise CAL (ECAL) Suite. Lync 2010 is the client software used to interact with the Lync Server 2010 Server and is licensed separately as a standalone license, or available via Office Professional Plus 2010.

Lync Server 2010

  • Lync Server 2010 Standard Edition :
    Standard Edition requires that primary server components, as well as the database for storing user and conference information, be configured on a single computer. Standard Edition is recommended for organizations that do not require higher availability through load balancing.
  • Lync Server 2010 Enterprise Edition :
    Enterprise Edition enables separation of server functionality and data storage to achieve higher capacity and availability. Enterprise Edition is recommended for organizations that require higher availability through load balancing.

Lync CAL Offerings

  • Lync Server 2010 Standard CAL
  • Lync Server 2010 Enterprise CAL
  • Lync Server 2010 Plus CAL

Move the ost-file

I’m running out of disk space on my main drive and noticed that my ost-file was really big. I know how to move pst-files, but that method does not seem to apply to ost-files.

How can I move my ost-file to another location?

Moving an ost-file to another location is indeed a bit more trickier than moving an pst-file. While it is recommended to leave the ost-file in its default location, there are still valid reasons for moving it to another location like for instance when using a smaller Solid-state Drive (SSD) as your main disk.

  1. Close Outlook.
  2. Copy the ost-file to the location where you want it to go.
    The defaults location for the ost-file is;

    • Windows Vista and Windows 7
      C:Users%username%AppDataLocalMicrosoftOutlook
    • Windows XP
      C:Documents and Settings%username%Local SettingsApplication DataMicrosoftOutlook
  3. Use the Mail applet in Control Panel to open your E-mail Account settings.
  4. Double click on the Exchange server account and choose More Settings…
  5. Select the Advanced tab.
  6. Disable the option; Use Cached Exchange Mode.
  7. Press Apply.
  8. Press the button; Offline Folders File Settings…
  9. Press the button; Disable Offline Use
  10. Press OK on the warning dialog that pops-up.
  11. Press again on the button; Offline Folders File Settings…
  12. Now browse to the new location of the ost-file.
  13. Press OK to return to the Advanced tab.
  14. Enable the option again for Use Cached Exchange Mode.
  15. Close all open dialogs and rename the ost-file in the old location from .ost to .old
  16. Start Outlook.

Outlook will now use the ost-file from the new location and you can safely delete the ost-file from your main disk.

Offline Folder File Settings
It takes some clicking to make the ost-file location field editable.

Note: Don’t place the ost-file on a network share. This is unsupported and it would defeat the purpose of enabling Cached Exchange Mode. The ost-file should reside on an internal drive.

courtesy : www.msoutlook.info/question/463

Install Self Signed Exchange 2010 SSL certificate

For my example, my domains are…

Local domain: vcp.local
Outside domain: vcpdomain.com.au

#NETBIOS name of Client Access exchange server:        vcpsydex01
#Internal FQDN (AD name):        vcpsydex01.vcp.local
#External FQDN (Public name):        smtp.vcdomain.com.au
#Autodiscover name:            autodiscover.vcdomain.com.au
#SubjectName:                cn=smtp.vcdomain.com.au

Run the following command on the Client Access Server for generating the new Self-Signed SSL cert using the names listed above:

New-ExchangeCertificate -FriendlyName “SelfSigned Cert” -SubjectName “cn=smtp.vcdomain.com.au” -DomainName vcpsydex01,vcpsydex01.vcp.local,smtp.vcdomain.com.au, autodiscover.vcdomain.com.au -PrivateKeyExportable $True

Prior to Windows Vista SP1, the Windows RPC/HTTP client-side component required that the Subject Name (aka Common Name) on the certificate match the “Certificate Principal Name” configured for the Outlook Anywhere connection in the Outlook profile. Therefore, as a best practice, you should ensure that smtp.vcdomain.com.au is listed as the Subject Name in your certificate unless you plan on changing the configuration which can be achieved by using the Set-OutlookProvider cmdlet with the -EXPR parameter as described in http://msexchangeteam.com/archive/2008/09/29/449921.aspx.

Open IIS on the Exchange Server and tell it to use this certificate.

  1. Click on the Default Web Site
  2. Click Bindings on the right
  3. Select HTTPS, and choose edit
  4. Under SSL certificate, click the drop down list and choose your certificate that you created earlier.
  5. You need to setup the following external DNS entries 1. smtp.vcdomain.com.au 2. autodiscover.vcdomain.com.au, these need to point to the external IP address of your Exchange CAS server.
    The next few steps are to install the certificate to the Clients.
  6. From Internet Explorer, navigate to the website of your OWA, https://mail.vcdomain.com/owa Click on Certificate Error, then click View certificates.
  7. Click Install Certificate
  8. Click Next
  9. Select the second option
  10. Select the box Show Physical Stores, Under Trusted Root Certification Authorities, select Registry and click OK

    Please note, you will need to repeat this step again and choose Local Computer. 

  11. Click Finish
  12. Select Yes. Close and re-open Internet Explorer.
  13. Close and restart Internet Explorer.

For more information, please refer to http://msexchangeteam.com/archive/2007/07/02/445698.aspx

Configure an SSL Certificate for Exchange Server 2010

Exchange Server 2010 like its predecessor Exchange Server 2007 makes heavy use of SSL certificates for various communications protocols. When you install a new Exchange server is comes pre-configured with a self-signed certificate. Before putting a new server into production you should create and assign a new SSL cert for the server.
In this example an SSL cert is being configured for the contoso.local organzation.

Generate a New Exchange Server 2010 Certificate

In the Exchange Management Console navigate to Server Configuration. Right-click the server and choose New Exchange Certificate.

Enter a friendly name for the new cert. In this example I have named it “Contoso Exchange Server”.

Although wildcard certificates are supported in Exchange Server 2010 it is recommended to use a SAN (Subject Alternative Name) cert instead.

Next we can configure the names for each of the Exchange 2010 services that are secured with the SSL certificate.

First is the Outlook Web App service. Enter the internal and external names of Outlook Web App. In this example I am using “ex2010.contoso.local” for internal, and “mail.contoso.local” for external.

Next configure the ActiveSync domain name. For ease of administration and configuration I am using the same name as for Outlook Web App.

Next are the Web Services, Outlook Anywhere (http://exchangeserverpro.com/how-to-configure-exchange-server-2010-outlook-anywhere) and Autodiscover names. Once again I am using the same name of “mail.contoso.local”. For Autodiscover the additional names of “autodiscover.contoso.local” and “autodiscover.xyzimports.local” are also configured, for each of the accepted email domains in this example organization.

The Hub Transport server also requires SSL for secure SMTP communications. In this example I am using the name “mail.contoso.local”.

A legacy name for co-existence is required if you are planning to gradually transition services and data from Exchange 2003 to Exchange 2010. Configure legacy names for each of the namespaces in the organization, in this example “legacy.contoso.local” and “legacy.xyzimports.local”.

When all of the services have been configured proceed to the next step of the New Exchange Certificate wizard.

Confirm that all of the required names have been included in the cert request. You can add any additional names at this stage before proceeding.

Next configure the organization and location information for the certificate, and choose a location to generate the request file.

When you have finished filling out the wizard click the New button to generate the cert request file.

Confirm that the request file was successfully generated.

You will notice that the wizard makes a recommendation as to the type of certificate that is required for your Exchange organization. In most cases a “Unified Communications certificate” will be necessary, which is basically another name for a SAN certificate.

Although you can issue the certificate from a private Certificate Authority it is recommended to use acommercial Certificate Authority such as Digicert.

After you have acquired the new certificate return to the Exchange Management Console, navigate to Server Configuration, right-click the server and choose Complete Pending Request.

Browse to the location of the file you downloaded from the CA and complete the wizard. Confirm that the new SSL certificate was imported successfully.

The new certificate now appears in the list of valid certificates for the server.

Assign the New Certificate to Exchange Server 2010

With the valid SSL certificate installed it is now time to assign it to the Exchange Server 2010 services. Right-click the new certificate and choose “Assign Services to Certificate”.

Choose the new Exchange server and click the Next button.

Choose the services to assign to the certificate. In this example the IIS and SMTP services are being assigned.

Complete the wizard to assign the services to the new SSL certificate. You will be prompted to overwrite the existing self-signed certificate, so choose Yes to that prompt.

How to Add the Partner of Record (POR) to an Office 365 Account

Below is the step to Add the Partner of Record (POR) to an Office 365 Account

1. First you will need to login to your Office 365 Admin Control Panel.

2. Click on Admin

3. Click on the Manage

4. Click on the office 365 product you have purchased.

5. Click add partner

6. Enter in our Microsoft Partner ID number : 2047350 and click on “Check ID” Please remember that you have to sign the Microsoft Online Services Partner Agreement before proceeding.

7. Once our ID has been found, click on “OK.”

8. You will see “Comprompt Solutions” below partner Name